Before connecting, make sure you have:
- A QuickBooks Online account with administrator access
- Ideally a plan that tracks inventory and raises purchase orders — usually Plus or Advanced, though plan names and contents vary by country (see below)
- Items in QuickBooks with SKUs or item codes
- Nothing else — signing up with QuickBooks creates your Dream MRP account as part of the same step
Start here. Signing up with QuickBooks creates your Dream MRP account and your first organisation together — there is nothing to set up beforehand.
Sign up with QuickBooks →On the Continue with QuickBooks step, leave the Read-only connection box ticked. QuickBooks has no view-only permission of its own, so Dream MRP keeps the promise itself: while the connection is read-only, nothing is sent back to QuickBooks. You can do everything else in Dream MRP.
You are sent to Intuit to sign in with your QuickBooks credentials and approve the connection. The permission Intuit shows is the same whether or not you chose read-only; the read-only promise is enforced by Dream MRP, not by the permission.
Dream MRP reads your items, inventory levels, vendors and open sales orders from QuickBooks Online. Where your plan has purchase orders, open ones count as supply already on its way.
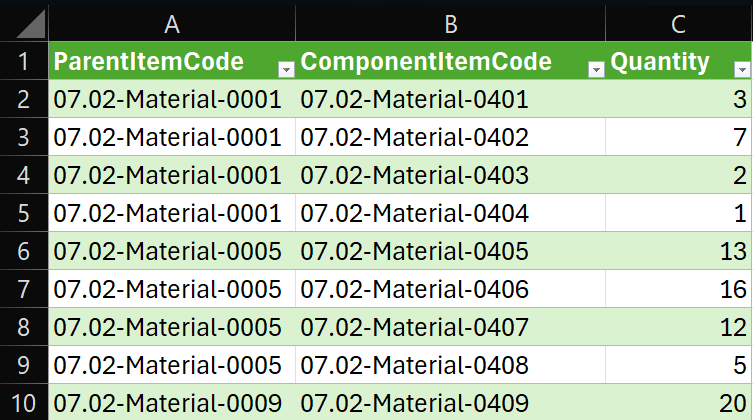
If you manufacture, this is the step that matters. A BOM links a finished item to its components and quantities, and Dream MRP explodes it through every level when it calculates. Build them in the app or import a spreadsheet by CSV, using the same item codes as QuickBooks. Or set one up by hand: in the Items menu, change an item from purchased to make to stock or make to order, then add its components one by one on screen. That is ideal for trying a single product during your trial. Resellers who only buy and sell finished goods can skip this step.

Run your first calculation. Dream MRP nets demand against what you already have and what is already on order, then plans the purchase orders and work orders to cover the difference. With a Read-Only connection you see the whole plan and QuickBooks is left exactly as it was.
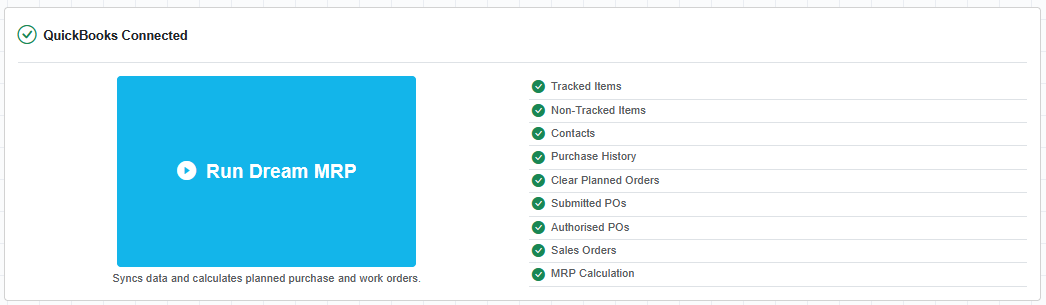
One button syncs your QuickBooks data stage by stage, then calculates the planned purchase and work orders.
Check the planned purchase orders and send the ones you agree with to suppliers. Check the planned work orders and open the ones you want to start. Where the plan is not quite right, set up the data it was missing, such as an item’s default supplier, minimum stock level or package size, then run MRP again. A couple of passes is usually all it takes.
The connection is already live; it is just one way. If you want it two-way, switch it in Settings. On plans with inventory (Plus and above), approved purchase orders then post to QuickBooks and completing a work order updates stock on hand. Or stay read-only for good: that can be a valid long-term process, particularly if you enter supplier bills in QuickBooks anyway.
Which QuickBooks plan you are on
Inventory tracking and purchase orders belong to the higher QuickBooks Online plans, typically Plus and Advanced. The entry-level plans — Simple Start and Essentials — do not include them, and the plan names and their contents vary by country, so check your own subscription rather than going by name.
If your plan has no inventory or purchase orders, Dream MRP still connects. It reads your items and sales and shows total demand in the same way a cookbook shows the total recipe, and you create purchase and work orders in Dream MRP from that view, checking by hand that you do not over-buy. There is nothing to post to, so the connection behaves like a Read-Only connection whatever you chose at sign-up. Your invoicing flows into QuickBooks just as it does now.
Dream MRP never holds your on-hand quantities itself — it always reads them from the systems you connect. So on a plan without inventory, on-hand comes from wherever you do track it: a Shopify store, or your own system over the API. Demand can come from sales forecasts rather than sales orders, which is often the more useful signal anyway when you are buying ahead. Forecasts are available from the Standard plan up.
Bills of materials, work orders and your minimum stock levels live in Dream MRP whatever your QuickBooks plan, so a lower plan is not a reason to wait.
Next steps
- Set minimum stock levels and package sizes on the items that need them
- Configure preferred suppliers per item so planned orders group correctly
- Add sales forecasts if you buy ahead of confirmed demand
- Turn on auto-approve purchasing and auto-start work orders for the suppliers and products you trust
If you run into any issues: check the general setup guide, or contact us at support@dreammrp.com.